Recovering a Ruckus Access Point Using the Serial Port
I recently bought a few used Ruckus R710 access points on eBay for my Ruckus Unleashed network. Usually, these APs are quite pricey, but I got a great deal at just one-tenth of the cost. They often come from business settings and are used with a Ruckus ZoneDirector, which means they can’t be used directly in an Unleashed network. The only difference between an Unleashed AP and a ZoneDirector AP is the software. An Unleashed device comes with Unleashed software pre-installed, but the ones I bought had ZoneDirector firmware, so I needed to update them with Unleashed firmware.
To do this, I connected the Ruckus AP to a PoE injector using an Ethernet cable, and then connected the other end to my computer. I set a static IP on my computer as 192.168.0.100 with subnet mask 255.255.255.0 (the router can be empty or 192.168.0.1). You can also use any other IP in the 192.168.0.0/24 range, except 192.168.0.1, as the Ruckus AP will use that IP. Then, I reset the AP to factory settings by pressing the reset button for 10 seconds, which lets me log in with the default credentials later. The LED flashes red, orange, and yellow while holding the button and turns red after releasing it. The AP should finish booting after a minute.
Next, you can update the firmware through the web interface or command line. I chose the web interface as it’s faster and easier. First, I downloaded the latest Unleashed firmware for the R710 here. Thankfully, software updates and downloads are free and don’t need a support contract with Ruckus, although you will need a free account on their website. I chose the latest Unleashed bl7 file available, which was 200.12.10.5.234. Then, I accessed the AP’s web interface at https://192.168.0.1/ and logged in with the username/password combination of super/sp-admin. I went to Maintenance -> Upgrade and uploaded the firmware under the Local tab. The AP should run the latest Unleashed version after a few minutes.
This process worked for the first four APs, but the last one was more challenging. The web interface didn’t appear when I tried to access the IP through HTTP or HTTPS, and an SSH session couldn’t be started as the connection was refused. A quick nmap scan showed that only two TCP ports were open:
floris@mac ~ % nmap -p- 192.168.0.1
Starting Nmap 7.92 ( https://nmap.org ) at 2022-02-01 11:32 CET
Nmap scan report for 192.168.0.1
Host is up (0.00069s latency).
Not shown: 65533 closed tcp ports (reset)
PORT      STATE SERVICE
1883/tcp  open  mqtt
18301/tcp open  unknown
MAC Address: 58:B6:33:xx:xx:xx (Ruckus Wireless)

Nmap done: 1 IP address (1 host up) scanned in 2.33 seconds
Only MQTT and Ruckus’ internal wireless performance testing service SpeedFlex seem to be accessible on the AP, which aren’t helpful for flashing the firmware. People on Ruckus forums suggest resetting the AP again and connecting via SSH. However, no matter how long I held the reset button, SSH didn’t appear on the AP. This leaves us with one option left: the serial console. I recently bought this inexpensive USB to serial adapter (PL2303TA) to try and recover a poorly flashed TP-Link RE450 with OpenWrt. In the end, I couldn’t establish a connection to the device, which might have been due to the adapter, but was more likely a faulty soldering job. Fortunately, most Ruckus access points, including the R320, come with easily accessible pins, so no soldering is needed.
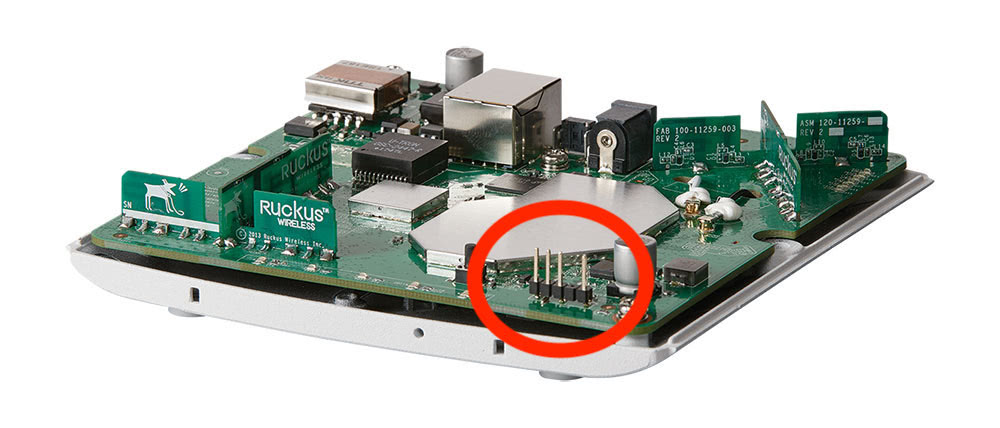
My R710 had these pins too, but they were angled at 90 degrees, which prevented me from connecting them directly because the shell was in the way. So, I tried to remove the screws to take the PCB out of the shell. Be aware that Ruckus states your warranty is void and the device isn’t covered under the support contract if you open the device or modify it in any way. I’m not sure about the legality of voiding warranties upon opening the device, but since these devices are second-hand and without any contract, I have nothing to lose.
The next issue I encountered was that even after removing all the screws, the PCB wouldn’t budge. I tried using a plastic tool to pry it off the shell, but it only produced cracking noises, so I quickly stopped. I sat down for a moment and considered my options. I could either solder the pins or bend them. Given the least destructive method and the outcome of my previous soldering attempt, I chose the second option. Ruckus doesn’t provide any information on these pins or the line coding. I found some people who tried interfacing with these access points via serial and discovered that the middle pin was VCC, which isn’t necessary for a successful connection. This left me with three other pins to bend.
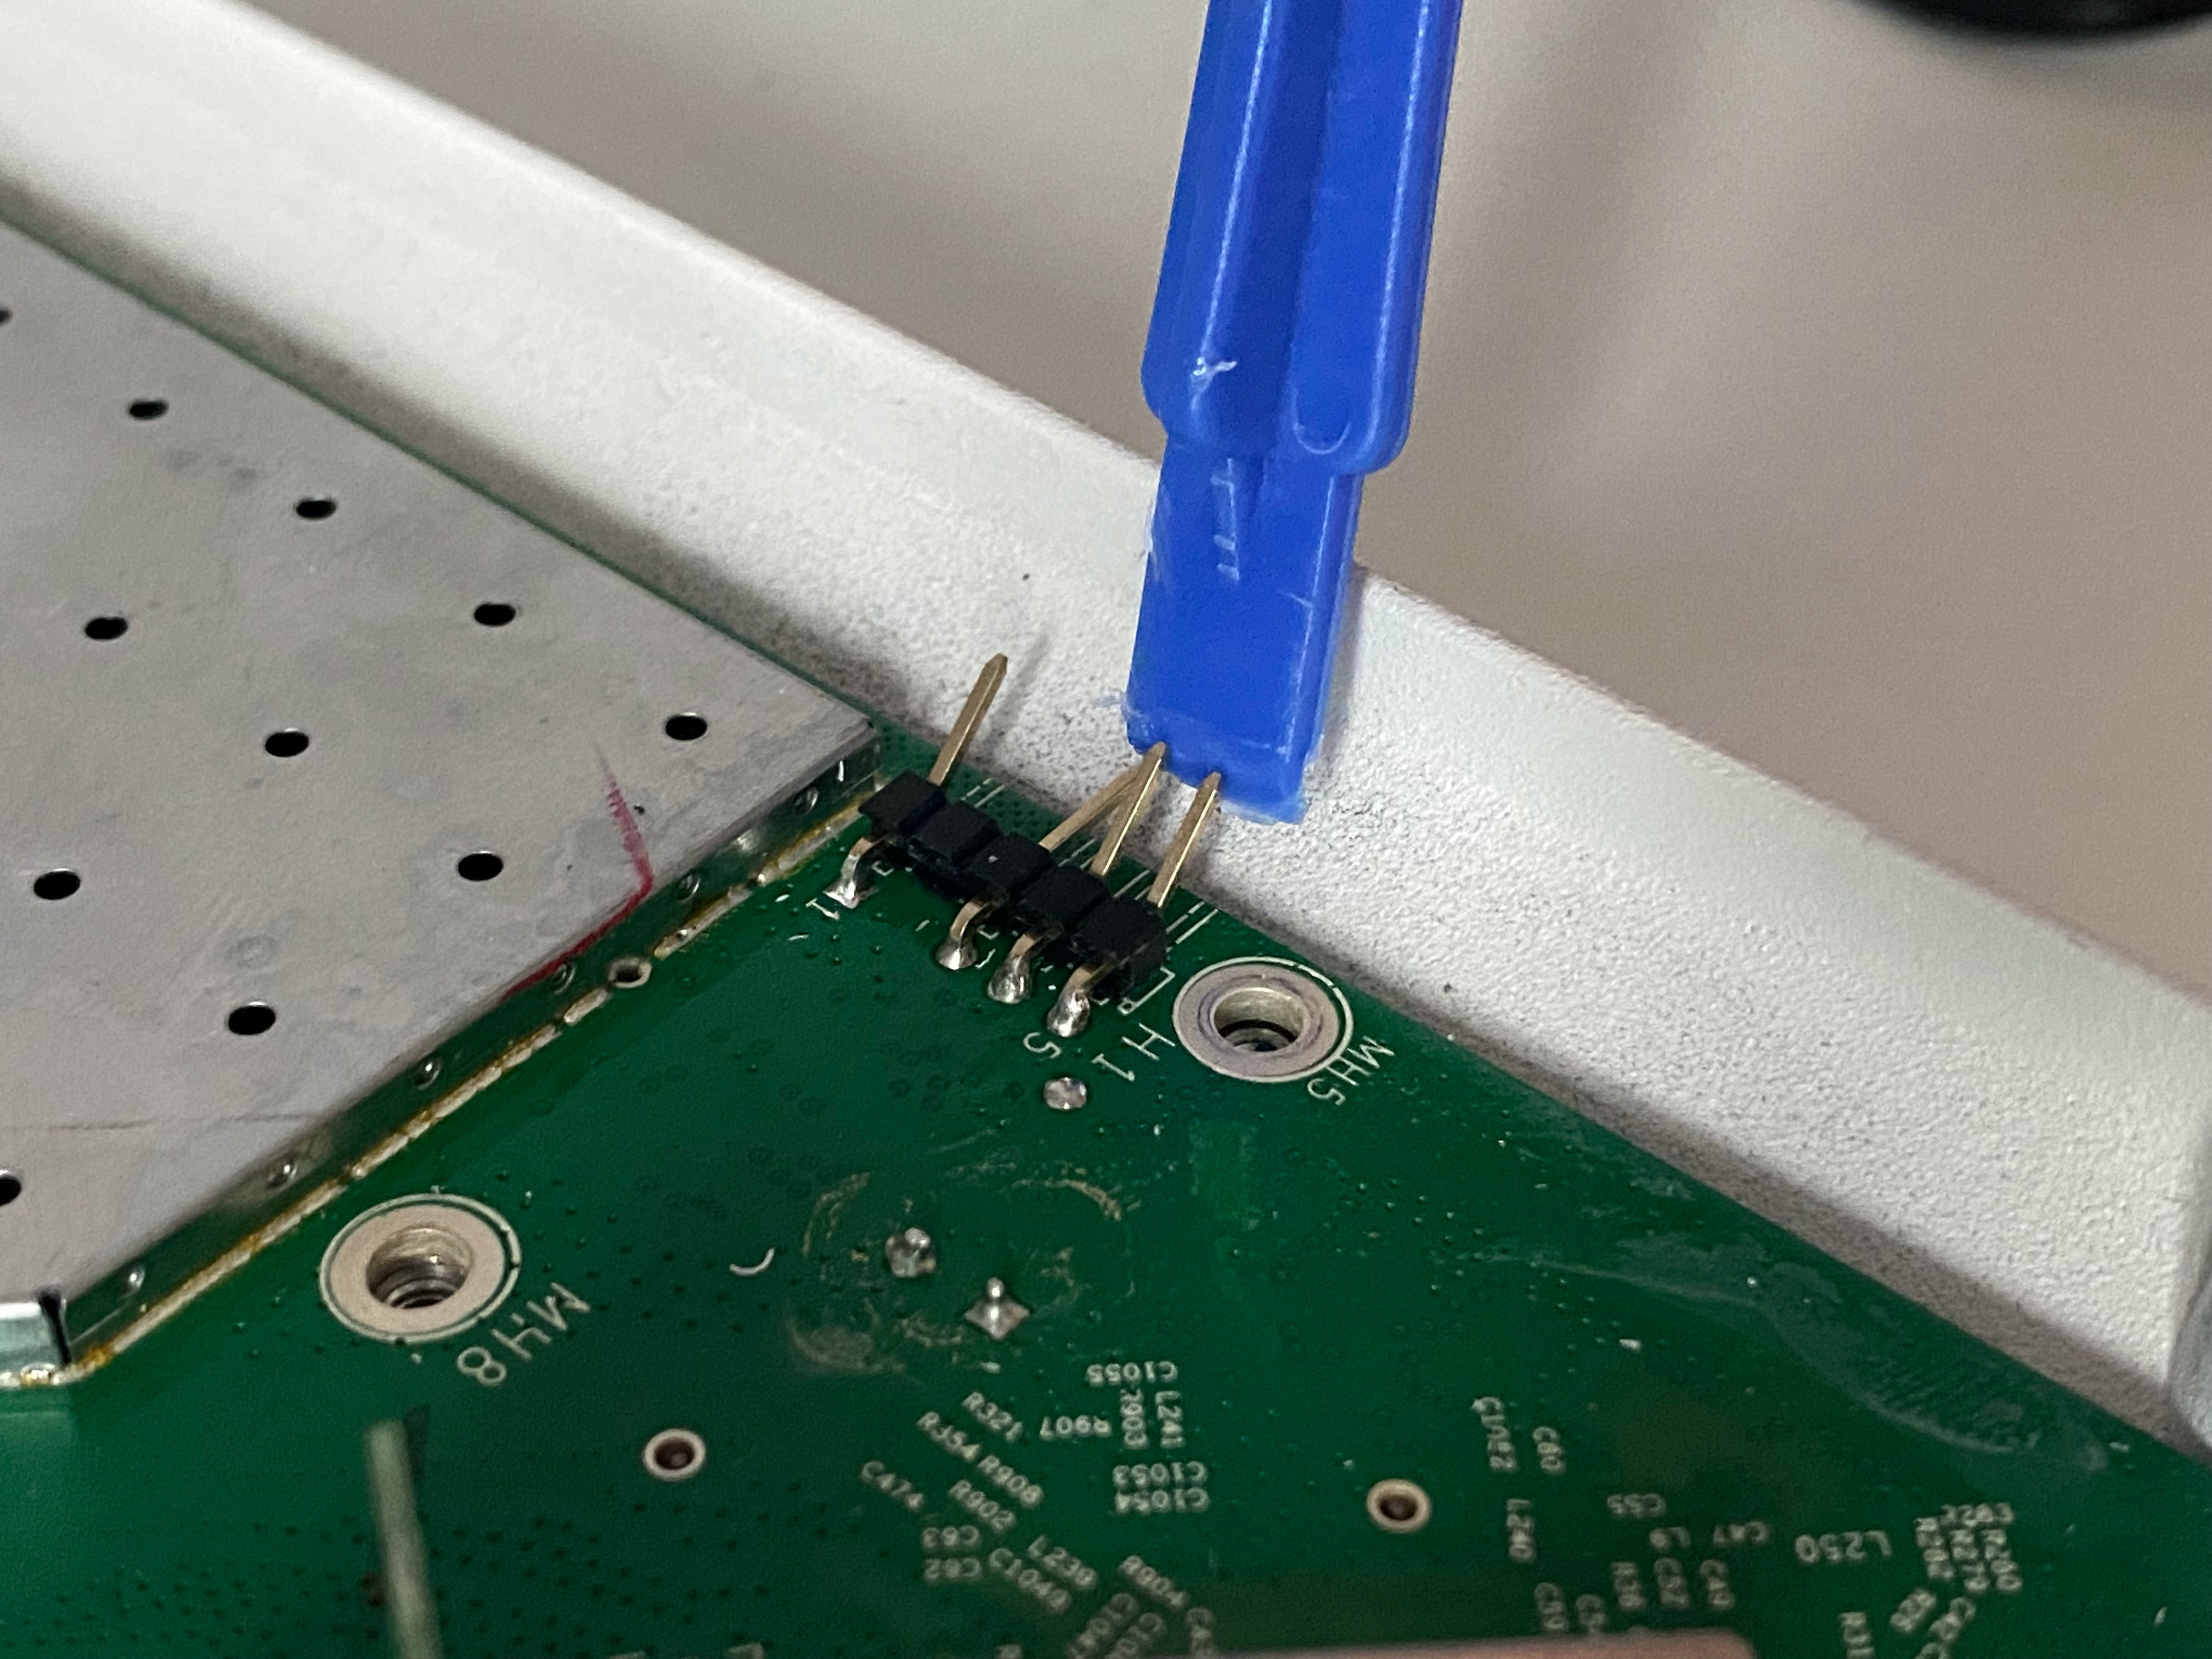
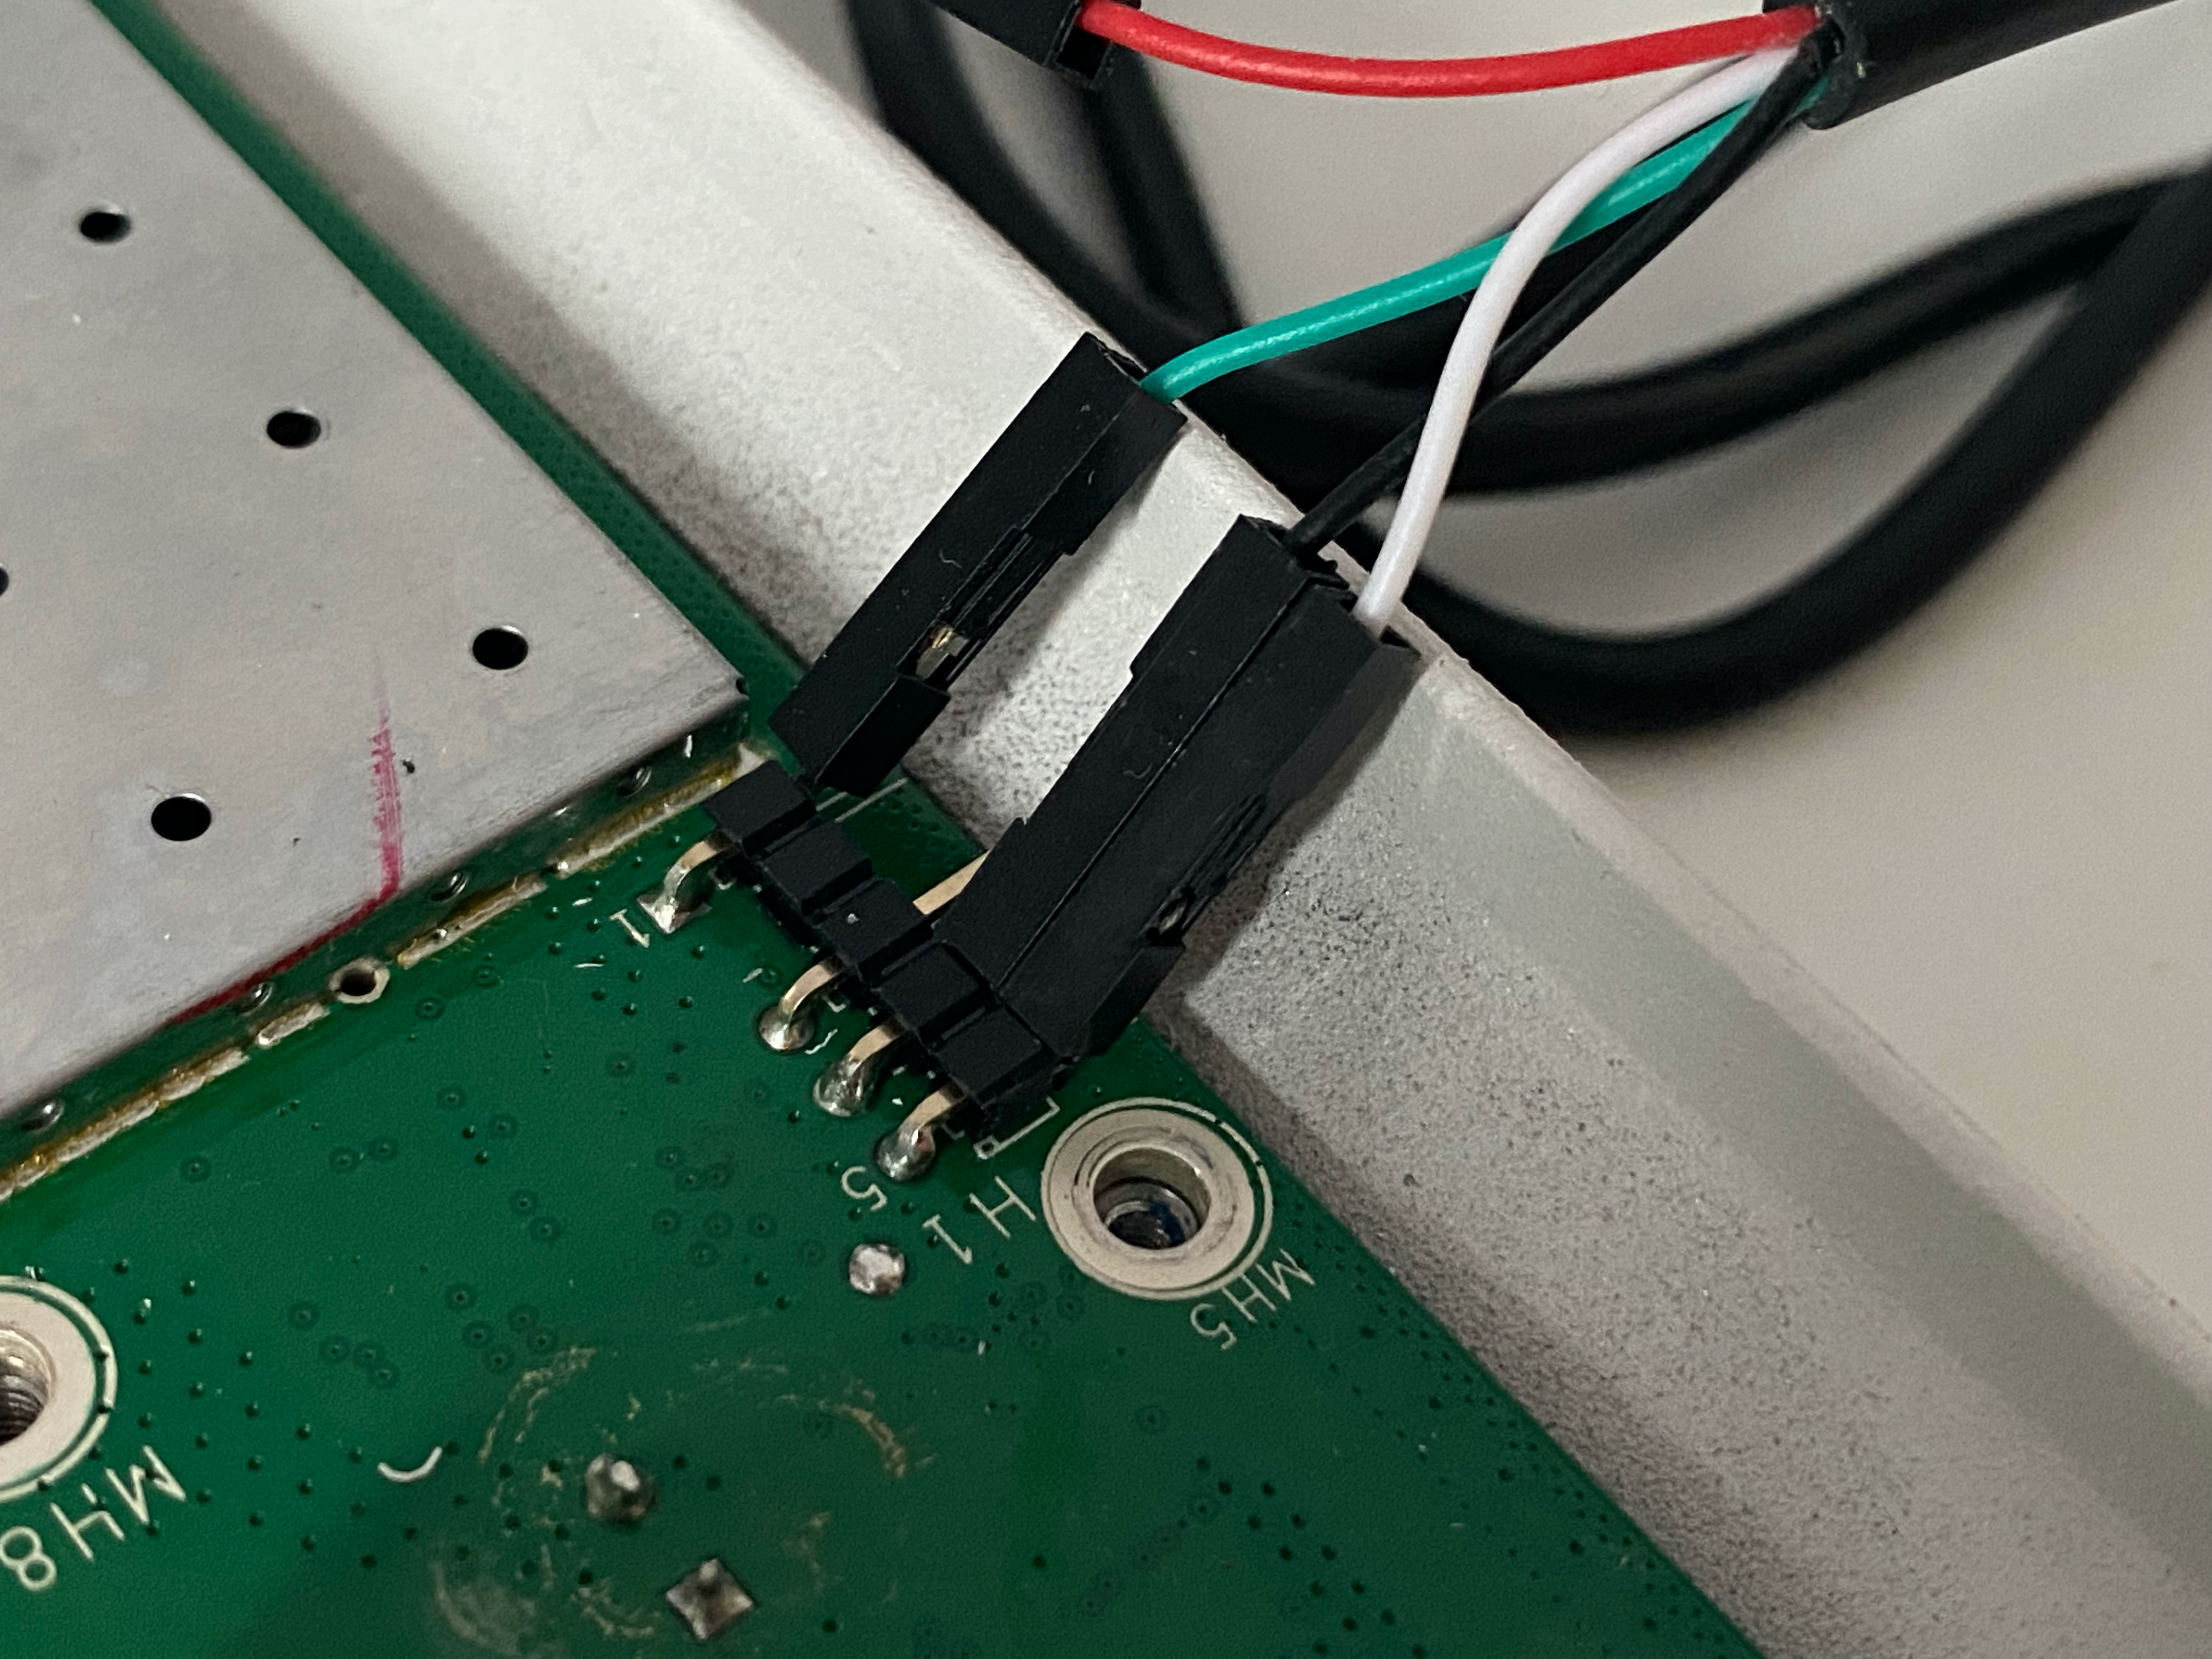
Only pin 1 and 5 are marked (left and right in the picture above). After some trial and error, I found the following pin configuration: 1 - TXD, 2 - Empty, 3 - VCC, 4 - GND, 5 - RXD. For line coding, it uses a baud rate of 115200, 8 data bits, no parity, and 1 stop bit (115200 8N1). I then used the excellent macOS app “Serial” to interface with the device. In the end, my setup looked like this:
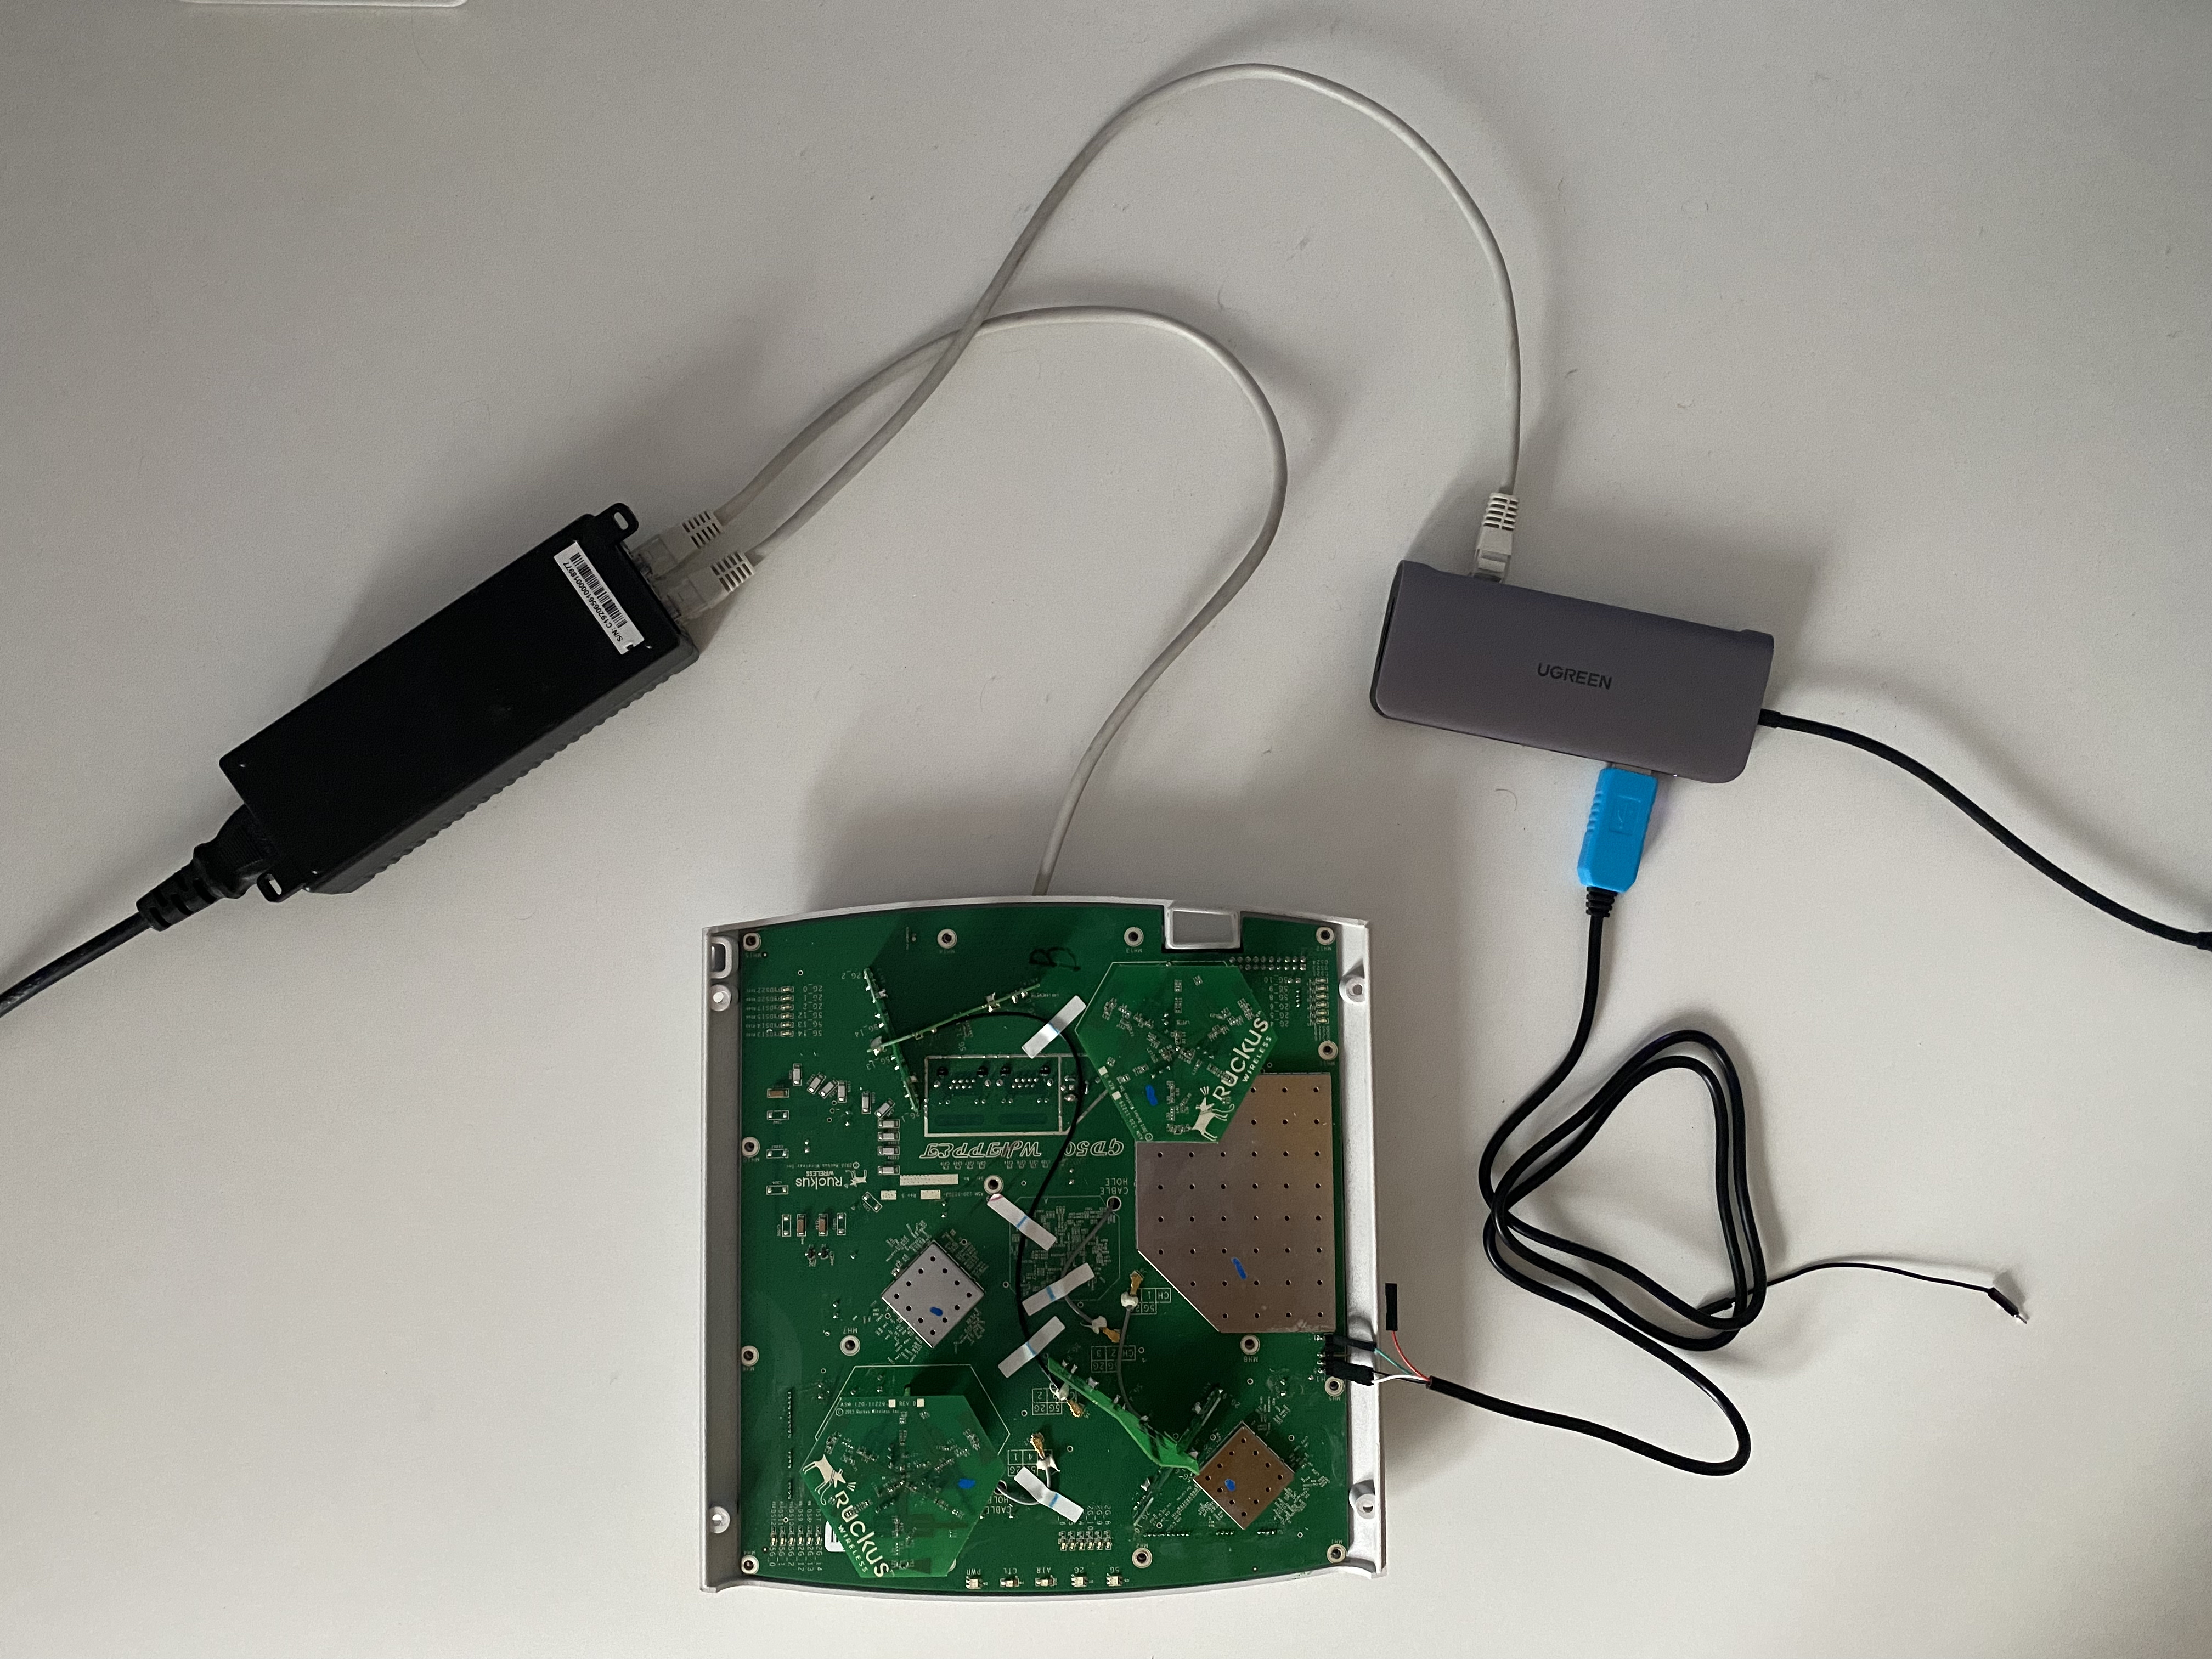
Now we can actually start to flash the device, the same way we would do it via SSH. We’ll need the firmware we downloaded earlier and a TFTP server running. I used the macOS app “Transfer” for this, an easy-to-use visual TFTP server. First, we need to move the firmware to the Transfer server’s root directory, which is ~/Transfer by default. Then we need to tell the AP which TFTP server to use (our previously set static IP) and which file to download from it:
rkscli: fw set host 192.168.0.100
OK
rkscli: fw set proto tftp
OK
rkscli: fw set port 69
OK
rkscli: fw set control R710_200.12.10.5.234.bl7
OK
Everything seems to be in order, so we can begin downloading the firmware and upgrading by using the fw update command:
rkscli: fw update
fw: Updating rcks_wlan.bkup ...
net_get_flash_ubi(192.168.0.100, R710_200.12.10.5.234.bl7, rcks_wlan.bkup,, 0)
...
You should be able to see the firmware being downloaded from the TFTP server:
![]()
It might take some time, but you should be able to see the progress in both the serial console and the TFTP server. Next, the firmware image will be applied:
...
flash id is 0
imghdr.{hdr_len=160, bin_len=39870304}
fw_flash_read_open: kernel open(/dev/ubi0_0) rootfs open(/dev/ubi0_1)
fw_flash_read_open: kernel open(/dev/ubi1_0) rootfs open(/dev/ubi1_1)
flash id is 0

Image2 FW check ...

MD5 = 864C5353A6F4F85B9BD9388BB7A67203
tail_offset 0 bin_len 39870304 sign 2.
net_get_flash_ubi, Upgrading from Intermediate Signed Image(ISI) to Fully Signed Image(FSI) image.
fw_ubi_write_open: kernel open(/dev/ubi1_0)
fw_ubi_write_open: rootfs open(/dev/ubi1_1)


Flashing KERNEL image(2.44MB)
[====================================================================================================] 100

Flashing ROOTFS image(35.59MB)
[====================================================================================================] 100

Reading Image TAIL:- TLV No-1.TLV INFO
  Number of TLVS in Tail is 3.
  Size of Tail is 3160. len 9 tail_len = 9
2. SIGNATURE OBTAINED SUCCESSULLY
len 515 tail_len = 524
        cert len 2118 pass
3. CERTICATE OBTAINED SUCCESSFULLY
len 2121 tail_len = 2645
Unknown TLV in the Tail =4 0 2 7b.
len 515 tail_len = 3160

MD5 Checksum successful!!!!!!!!!

Checking Image hash:-
1. Obtaining public key from Certificate.
        Executing openssl x509 -in /tmp/in_cert.pem -pubkey -noout >/tmp/pubkey.pem
        line: Certificate will not expire
  Certificate validity verified.
        line: /tmp/in_cert.pem: OK
2. Public key verified.
3. Decrypting the Image signature.
        Executing openssl rsautl -verify -pubin -inkey /tmp/pubkey.pem -in /tmp/signsure.bin -out /tmp/ext_sha256.
4. Comparing the signatures:-
  IMAGE TAIL SHA256 :
        7b75ac3f3f5e1f90c321af621faab199d925f6c8031dcd7b84a7b9354ef91b9c
  CALC SHA256 :
        7b75ac3f3f5e1f90c321af621faab199d925f6c8031dcd7b84a7b9354ef91b9c
        HASH CHECK PASSED.

AIS cleanup : Removing /tmp/ext_sha256...
AIS cleanup : Removing /tmp/in_cert.pem...
AIS cleanup : Removing /tmp/signsure.bin...
AIS cleanup : Removing /tmp/pubkey.pem...
AIS cleanup : Completed
bdSave: sizeof(bd)=0x7c, sizeof(rbd)=0xd0
  caching flash data from /dev/mtd14 [ 0x00000000 - 0x00010000 ]
  updating flash data [0x00008000 - 0x000080d0] from [0xbeedfad0 - 0xbeedfba0]
_erase_flash: offset=0x0 count=1
Erasing 64 Kibyte @ 0 -- 100 % complete
  caching flash data from /dev/mtd14 [ 0x00000000 - 0x00010000 ]
  verifying flash data [0x00008000 - 0x000080d0] from [0xbeedfad0 - 0xbeedfba0]
**fw(2994) : Completed
All looks good! Now we can reboot and we should be on the Unleashed firmware:
rkscli: reboot
OK
rkscli: Receive reboot msg [u,1]

System information written to /tmp/reboot_support


*** Reboot by pid=4387: rsmd_func rsmd reboot 1 1  ***


***  Rebooting ... please wait ***

System Shutdown ...
 12:19:57 up 6 min, load average: 1.19, 0.91, 0.43
The system is going down NOW!
Sent SIGTERM to all processes
[  379.499750] watchdog: qcom_wdt: watchdog did not stop!
Sent SIGKILL to all processes
Requesting system reboot
[  380.522742] Restarting system.
Success! After a few minutes, the Unleashed interface appeared at https://192.168.0.1/.